Model a Helmet
http://www.studioexistence.com/sections/Tutorials/CG/Modeling/Helmet/Helmet%201.htm
Modeling A Head using Nurbs-Poly Technique
http://www.3dm-mc.com/tutorials/maya/head/
Basic Curves
http://www.animagraph.com.br/DeathBrain/Basic/curve_tutorial.htm
Spiral Modeling
http://www.christerb.com/tutorials/maya_modelspiral/index.html
Braid Modeling
http://www.christerb.com/tutorials/maya_modelbraid/index.html
Creating Smooth Wireframes with Maya
http://members.shaw.ca/visjes/tutorials/smoothwireinmaya/
Modeling a Spaceship
http://www.ckk.chalmers.se/tutorials/maya/Pages/Lesson5.html
Fish Modeling
http://members.aon.at/bulletin/sushi/
Modeling a Webcam
http://www.io.tudelft.nl/id-studiolab/compvis/learning/philips_webcam/webcam.html
How to make rounded corners with nurbs
http://www.gmask.com/tutorials/corners/corners.shtml
Wednesday, May 2, 2007
Tuesday, May 1, 2007
3-D Animation Workshop
Organized by The Animation Workshop on 14 to 15 April 2007 at Den Danske Filmskole, Theodor Christensens Plads 1, 1437 København K
Teacher: Kyle Balda (Pixar Animation Studios, Industrial Light & Magic, McGuff Ligne and more). Kyle’s credits include A Bug's Life, Monsters Inc., Toy Story 2 (Directing Animator), The Mask, The Flintstones, Mars Attacks, Jumanji, The Frighteners
Fee: 5.000 DKK (coffee and lunches included)
The other side of animation has to do with the abstract art of acting. This is where the animator becomes a story teller. As well as exploring the various elements involved in acting we will look at the more practical side of how these aspects apply to the animator.
Staging
The vastest principle of animation; in fact staging is an art form all to itself. In this module we will discuss…
Approaching the Shot: Putting it all together
Now we understand the two major challenges in character animation; physicality & acting. How do we put them together to create natural believable motion in a performance that is both entertaining and moving?
Teacher: Kyle Balda (Pixar Animation Studios, Industrial Light & Magic, McGuff Ligne and more). Kyle’s credits include A Bug's Life, Monsters Inc., Toy Story 2 (Directing Animator), The Mask, The Flintstones, Mars Attacks, Jumanji, The Frighteners
Fee: 5.000 DKK (coffee and lunches included)

About The Workshop
The Kyle Balda Masterclass is a two day workshop designed to offer an approach to 3D character animation that is widely used in feature animation production. The workshop is based on methodology, not a specific 3D animation software, so users from different backgrounds can benefit from the program regardless of the software they are familiar with.
For the most part, the material in the workshop is not technical. There will be no explanations of particular softwares; however, a lot will be said about the graph editor and dope sheet tools which are universal among 3D animation software programs. The majority of the topics covered during this weekend will have to do with the approach and completion of 3D characters, the procedures used, and tricks of the trade. See below for a list of topics that will be covered in detail.
About Kyle Balda
Kyle Balda has been working professionally in feature animation for the past 12 years, most notably with Pixar Animation Studios and Industrial Light & Magic. He began his career studying traditional animation at The California Institute of the Arts in 1991, continuing his training during summer internships with Lucas Arts and Pacific Data Images in the summer of 1993. Shortly after, Balda joined the crew of Industrial Light & Magic, where he participated in such films as The Flintstones, The Mask, Mars Attacks and Jumanji where he played the role as Supervising Animator. After animating on Peter Jackson's The Frighteners at Weta Digital in New Zealand, Kyle returned to California to work at Pixar on such films as A Bug's Life, Monsters Inc and as Directing Animator of Toy Story 2.
 |
Kyle Balda |
Kyle is presently living in France where for the past three years he has been conducting animation workshops at various European film schools including Les Gobelins, The Animation Workshop, and Filmakademie Baden-Württemberg as well as leading a 3D animation workshop at Richard Williams 2002 Masterclass and numerous lectures at European film festivals. Kyle also stays heavily involved in 3D animation production as a director and supervising animator at Macguff Ligne and Passion Studios in Paris.
Topics covered in detail during the Workshop
A new look at the Classic Principles
|

The other side of animation has to do with the abstract art of acting. This is where the animator becomes a story teller. As well as exploring the various elements involved in acting we will look at the more practical side of how these aspects apply to the animator.
- The Eyes & Brows |
Staging
The vastest principle of animation; in fact staging is an art form all to itself. In this module we will discuss…
- Dealing with Multiple Characters |
Approaching the Shot: Putting it all together
Now we understand the two major challenges in character animation; physicality & acting. How do we put them together to create natural believable motion in a performance that is both entertaining and moving?
- Blocking
- Beyond Blocking
- The Animators Role in Production
Timing in Animation
Timing for eyes is a very simple concept.

This is probably the most basic eye blink time chart
Lets make an eye with using this chart.

Now by playing around with the timing to get a chart like this..

basically you are playing around with the 2nd and the 4th frame, thus producing a result which may look like this.


This is probably the most basic eye blink time chart
Lets make an eye with using this chart.

Now by playing around with the timing to get a chart like this..

basically you are playing around with the 2nd and the 4th frame, thus producing a result which may look like this.

Vector Animation
let me start my blog with vector animation in FLASH...exciting..:-)
you can also see an advanced customization of Flash from the previous post by clicking here
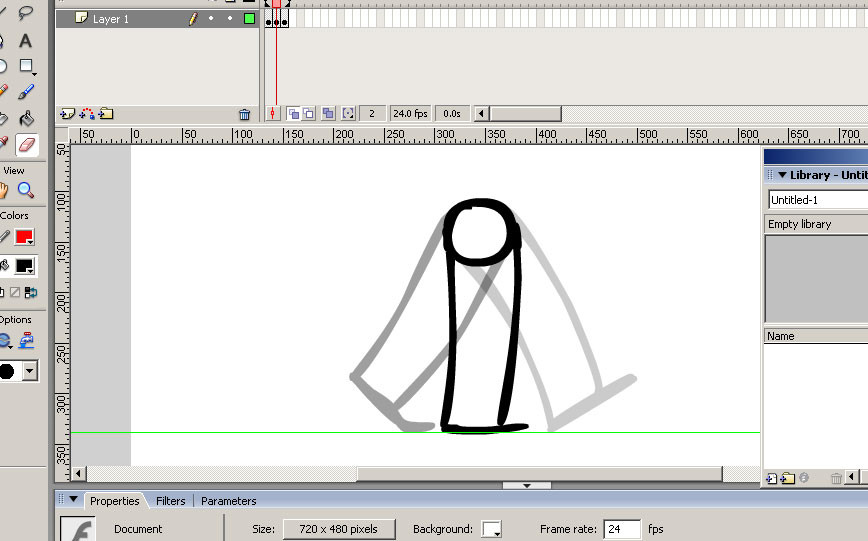
Next we are going to switch on the guides so that we have reference planes to work on for the walk cycle. Go to View/Rulers and select the Ruler, so that its switched on.

Click on the ruler and drag a guide line (a bright green line) on to the work area. Pull this line down to nearly 2/3rd of the document. This is virtually going to be the base on which the character will walk on.
Breaking Down the Cycle
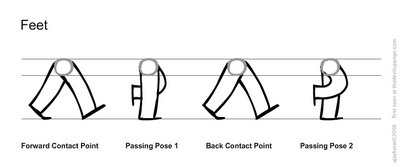
There are 4 poses that are the defining points of a walk cycle. Two Contact Points and Two Passing Poses of the leg. (Namely Forward Contact Point, Back Contact Point, Passing Pose 1 and Passing Pose 2)
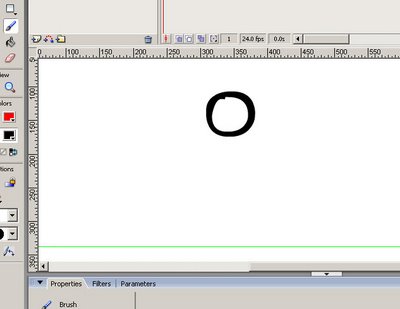
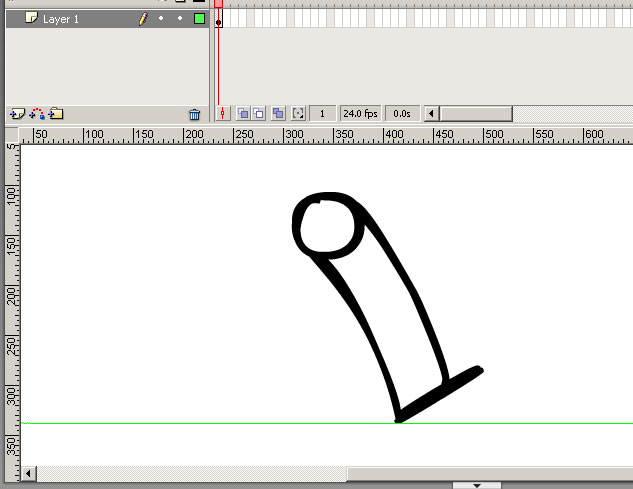
To help us maintain a steady size ratio of the leg we need some reference point. Thus to start off with we shall draw the pelvis, so now we are defined by the highest point of the leg (Pelvis) and the lowest point (served by the Guide Line)
Group the pelvis for we shall be using it for the other leg poses.
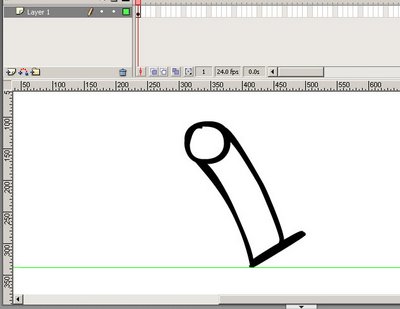
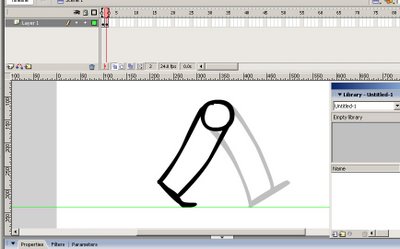
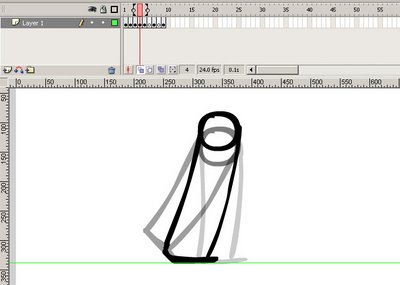
With the pelvis as the reference and the guide line as the base, draw the forward contact point of the leg.
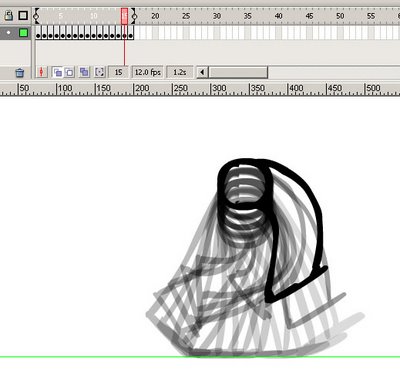
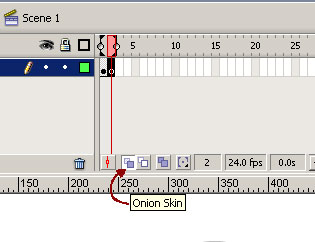
 Insert a Blank Keyframe(F7) and switch on the Onion Skin so that we are now able to draw the Back Contact Point of the leg on frame#2.
Note (to traditional 2D Animators) : Inserting a Black Keyframe is like using a clean sheet of paper and using the 'Onion Skin' is very similar to using a light box. It is like switching on the bulb in the light box.
Draw the back contact point of the leg
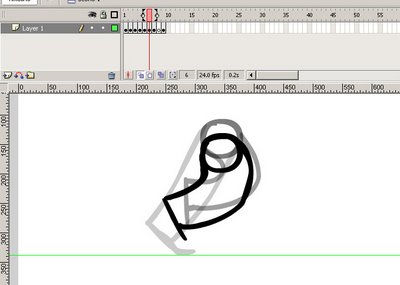
Insert a Blank Keyframe between frame1 and frame2. Here we are going to draw the Passing Pose 1.

Insert a Blank Frame after the Contact Pose 2 , i.e frame4 and draw the Passing Pose 2.
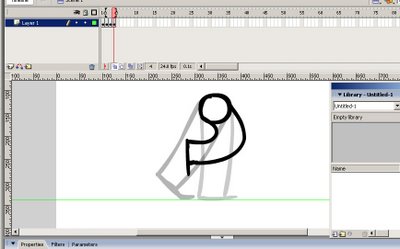
There are 4 poses that are the defining points of a walk cycle.
The Final Part
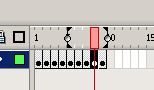
Now that we have the 4 breakdown poses, let us introduce blank frames between each of the frames already created.
TIP: Go to frame1 press "F5" and then press "F7" , now go to frame3 and repeat the process and so on.
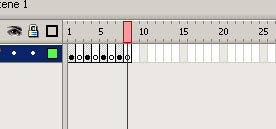
Create another blank frame after frame8 and copy frame1 to the the newly created frame9
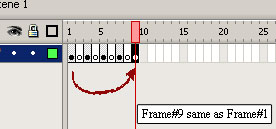
The reason we do this is because, after frame8 The leg returns back to frame1. For Onion Skinning purposes we created frame9 which is the same as frame1
By default the Onion Skin, shows two frames ahead and before the frame its upon. To make the onion skin show the contents of only one frame ahead and before, click here to view the video
This video will show you how to create an Inbetween (i.e frame2)
To create an Inbetween may require a little practice. I didn't get it correct when I did it the first time so its normal if you make a mistake, clear the frame and redraw the Inbetween again.
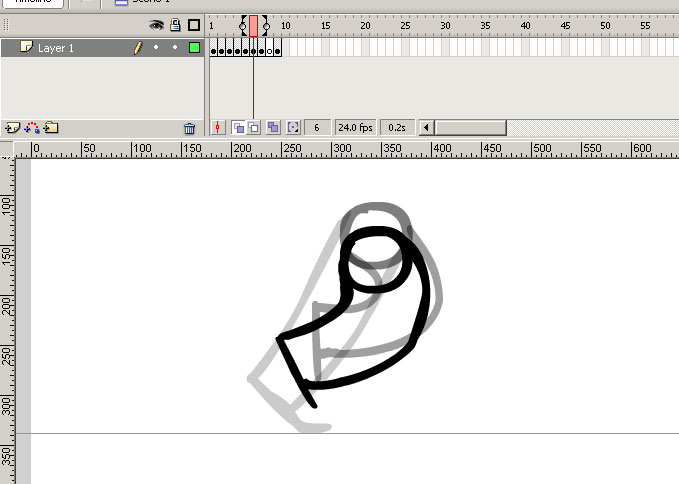
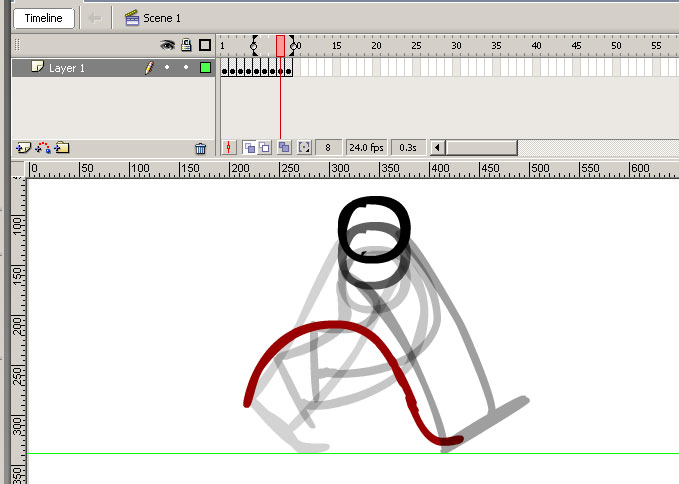
Once frame2 is done, go to frame4. Here the Pelvis is placed much higher.
And on frame6 the pelvis goes lower, Copy the pelvis position from frame2 and paste in place on frame6 before drawing out the leg.
Copy the pelvis from frame4 and paste in place on frame8 .
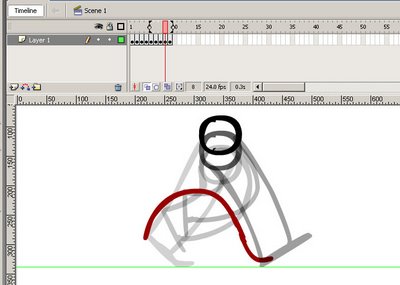
Now comes a different part . On frame8 the leg is coming down , but what kind of reference would you follow ? for if you Onion Skin only one frame ahead and one behind you might get a position which may not play smooth when you export the walk cycle for preview. To make sure that the leg follows a nice path , Onion Skin from frame5.

Create a smooth 'S' which touches the heel of all the leg poses and draw the Inbetween for frame8, using the heel reference which now lies on the red line.
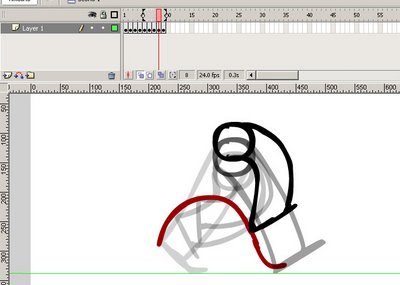
Delete the red 'S' curve. Right click on frame9 and choose "Remove Frames"
Use the "<" and ">" keys on the keyboard to go through the frames.
If you test your movie now (Ctrl+Enter) you will see the leg walking really fast. This is because the frame rate for this animation is very high.
Go to Modify/Document and drop the frame rate from 24 to 12. Pencil test (Ctrl+Enter) your movie.
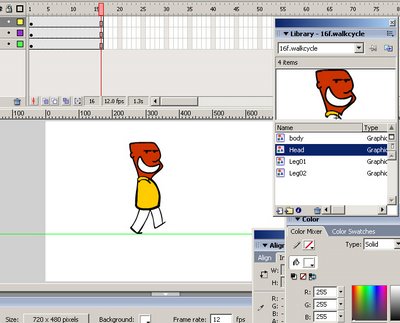
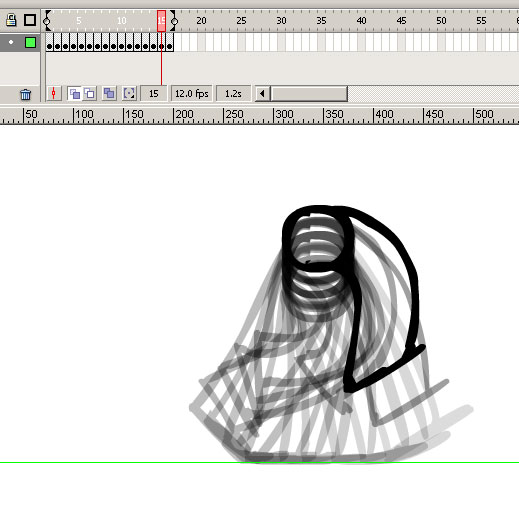
16 Frame walkcycle
Start by inserting blank keyframes between all the frames .
TIP: Go to frame1 press "F5" and then press "F7" , now go to frame3 and repeat the process and so on.
Note : after creating the last blank frame at frame 16. copy frame1 to the the newly created frame16. Draw the inbetweens for all the frames. do remember that the pelvis will also change position.
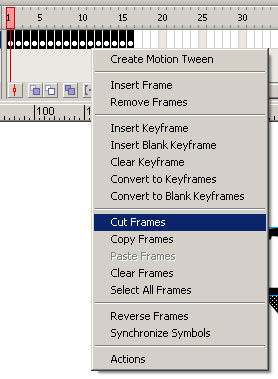
 Now that we have one animated leg complete, running at 12fps. Let us cut all these frames and place them in a 'Graphic Symbol' called Leg01
Note: While rigging a character, I generally suffix the character's body part with a number instead of a name like left or right, this side or that side, Because one will never know how many variations one is going to make out of that part, thus using the Suffix-name, one will have legLeft, legRight, and in case you want to make a variation of the leftLeg symbol , then you would have a new complicated symbol called legLeft01. To avoid all this, I just stick to body part and a number
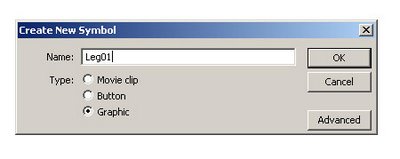
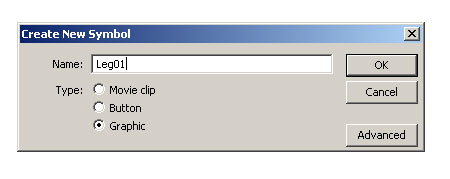
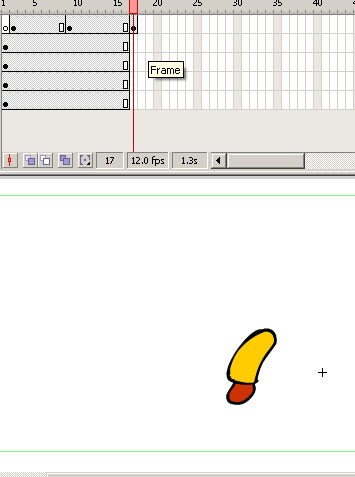
To cut the frames, first select all the frames (highlight them) and right click and select 'Cut Frames'. Once all the frames disappear from the time line. Go to Insert/New Symbol (Ctrl+F8). Name it Leg01 and select Symbol type as Graphic here
Now we are in the symbol, the timeline here shows only one frame. Right click on the first frame of the timeline and choose 'Paste Frames'. Go back to the main timeline. In the Library (Ctrl+L) drag the symbol 'Leg01'. Scrub the time line, or use the keys <> to see the leg animated.
Right click on the symbol in the library and choose "Duplicate", thus creating another symbol of the leg, name it Leg02. Drag Leg02 from the Library on to the main timeline.
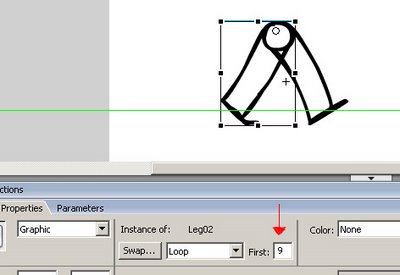
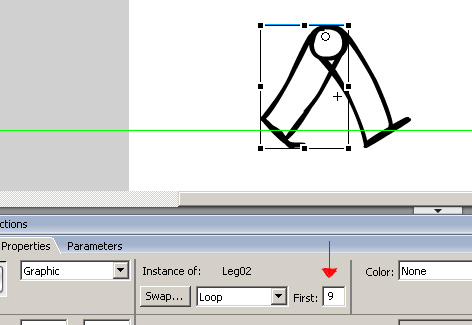
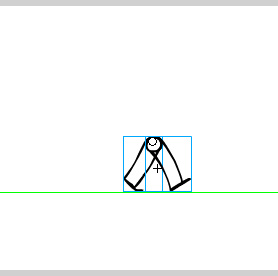
We have to match the pivot point of the symbol to that of the Legs pivot circle. So select Leg01, and from the toolbar select the free transform tool (Q) and move the small circle which is right at the center of the symbol and move it to the center of the leg's pivot. Repeat the same thing for the other symbol leg02 too.

Making sure you are on frame one, align the symbols one over the other in such a way that it looks like there is only one leg on the work area. Click on the symbol and go to the properties bar and change the instance of the symbol from 1 to 9.
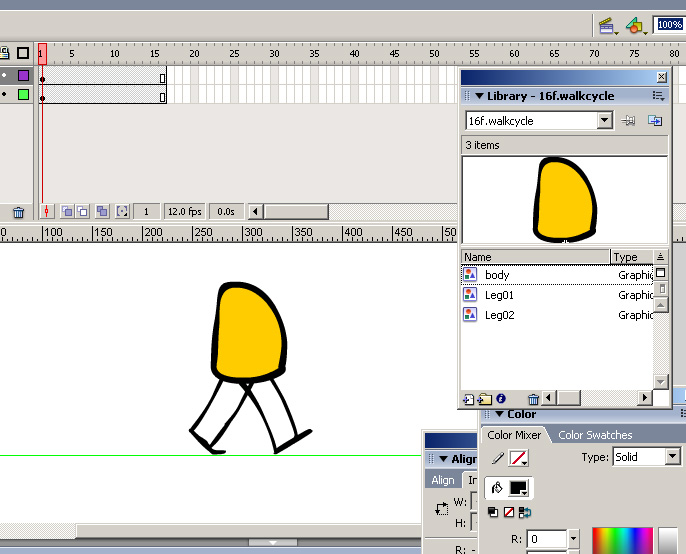
(Ctrl+Enter) Test the movie. to see the two legs move in sync.
click here to see sample
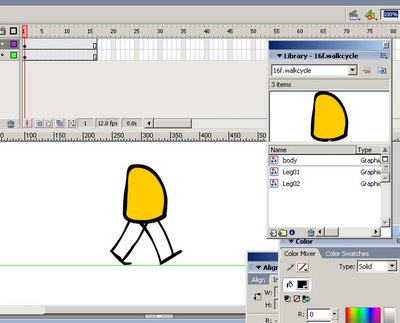
Let us now go and color up the legs. Click on one of the symbols to figure which symbol is leg01. since both the symbols are on the same layer. We are going to bring leg01 to the top, by selecting it and using Ctrl+Shift+up or Modify/Arrange/Bring to Front.
Scale the two symbols so that there is space for the body and head.

Create a new layer on top of this layer and draw a body. Convert it to a symbol (F8) and place it over the legs. Scrub the time frame to see if it fits over the leg.
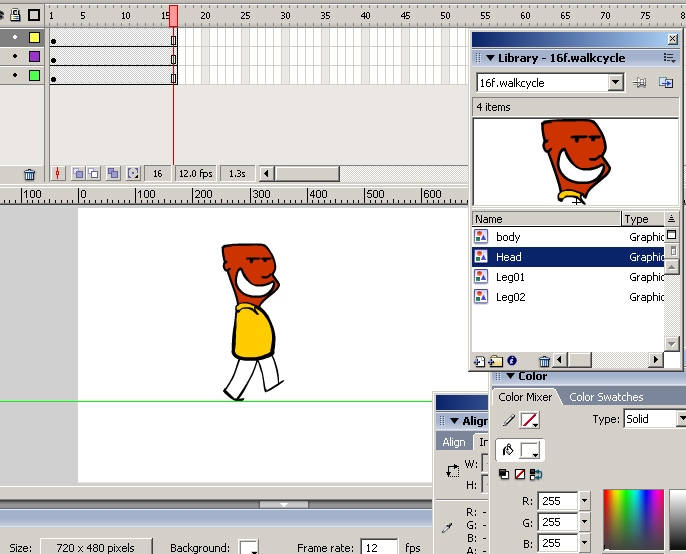
Create a new layer on the top and draw the head. Convert it to a symbol.
Note: I included a collar in the head so it helps while animating the head.
click here to see sample
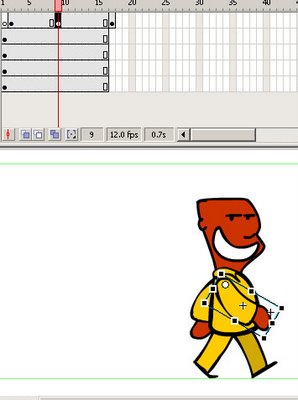
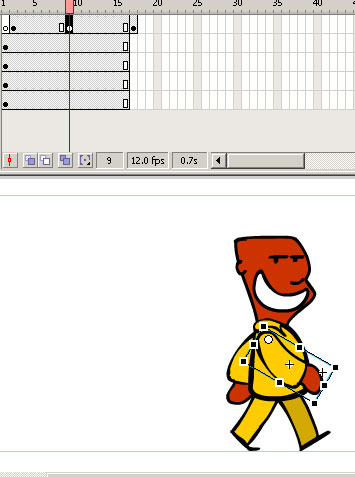
In a new layer, create the character's hand. Name the symbol 'Hand01'
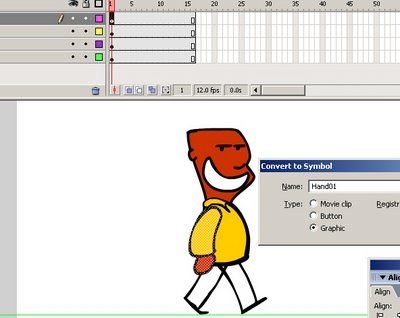
Using the Free Transform Tool(Q), move the pivot point to the shoulder.
Before we proceed any further, we shall fill color into the leg symbols. Color the Leg symbol at the back a color that's a bit dull as compared to the leg in the front.
Note: Once inside the leg symbol, you can use the edit multiple frame to select all the frames and ungroup the pivot for the leg, instead of individually going through each and every frame and breaking it up. Check this tutorial By Adam Phillips.
click here to see sample
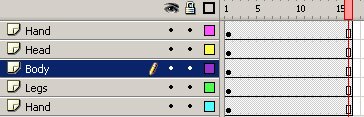
Our next step is to make the hand sway. We can have one hand on the top most layer and copying the same hand and placing it in the bottom most layer.
Thus renaming the layers, it would be organized like this.
Basic Walk cycle techniques: When the Leg is at its extreme the hand reaches its extreme only on the next frame. Thus it lags behind by one frame.
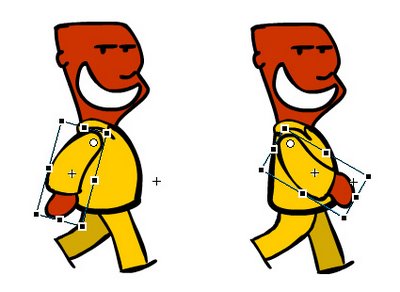
Create Three Key frames, namely on frame 2, 9 and 17. On 2 place the hand to its extreme position.
On 9 the hand is moved to the other extreme position.
And on frame 17, copy the hand position from 2 and paste it in 17.
Keyframe (F6) on frame 10 so that the hand has a hold of two frames on its extreme.
Now motion tween frames 2 to 9 and frames 10 to 17
On the Property bar, move the ease all the way to 100

Select Frame 17 and copy the position of the hand and 'paste in place' on frame 1.
Thus frame 1 and 2 will have the hand in one extreme position and frame 9 and 10 will have hand in the other extreme position.
Now repeat the same process from the other hand, but do remember to change the extreme position, in the opposite direction.
Once this is done, go back to the main timeline by clicking on the 'scene 1' on the top panel bar (as shown below)

Back on the main timeline, delete all the layers except the last one and rename that to character.
Note: Check to make sure that there are only 16 frames in the main timeline.
Drag the Character Symbol out of the library and place it on the stage. Test you movie,(Ctrl+Enter)
Download FLA. (160KB)
Go into the Symbol and introduce two new Keyframes at Frame 16, on the Head and Body Layer. Introduce Keyframes on every alternate frame on the same two layers such that the time line looks like this.
(a) At Frame3, select the body and head and make it fall lower, as the leg is coming to the Contact Position.
(b) At Frame7, select the body and head and make it rise higher, as the leg is coming to the Contact Position.
Repeat Step (a) for Frame11 and Step(b) for Frame15
Note: play around with the variation of body and head position with reference to the walk to get a varied style of the cycle
Add motion tween to all the key frames in the Head and Body Layer
Selecting all the tweened frames on the two layer considered, play around with the easy in or ease out to produce varied effects to the cycle.
Test you movie(Ctrl+Enter)
Download FLA. (144KB)
Example
Simple 8 and 16 Frame Walkcycle
Setting up the Stage
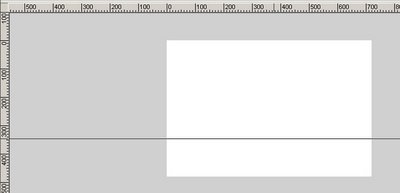
Before we start off this tutorial, its necessary to customize the document setting, so that there is a degree of similarity between what I see on my workstation and whats on yours. Let us customize the stage area first. Change your document (Modify/Document) settings to the one shown in the image below.
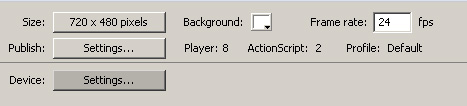
you can also see an advanced customization of Flash from the previous post by clicking here
Next we are going to switch on the guides so that we have reference planes to work on for the walk cycle. Go to View/Rulers and select the Ruler, so that its switched on.
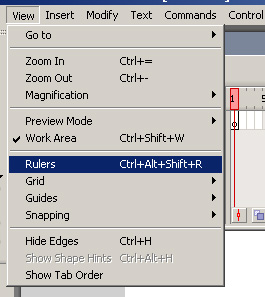
Click on the ruler and drag a guide line (a bright green line) on to the work area. Pull this line down to nearly 2/3rd of the document. This is virtually going to be the base on which the character will walk on.
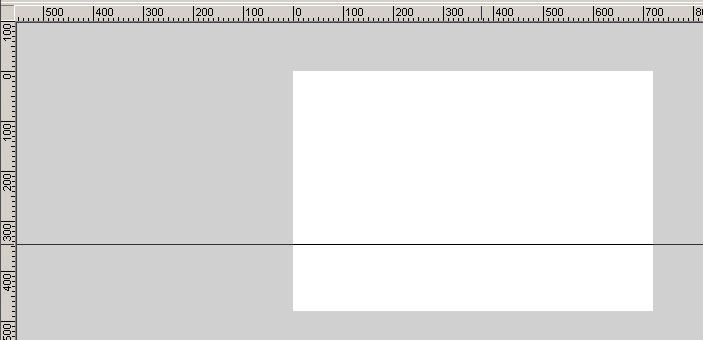
Breaking Down the Cycle
There are 4 poses that are the defining points of a walk cycle. Two Contact Points and Two Passing Poses of the leg. (Namely Forward Contact Point, Back Contact Point, Passing Pose 1 and Passing Pose 2)
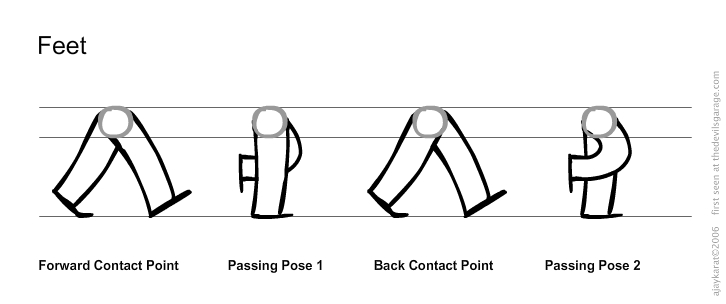
To help us maintain a steady size ratio of the leg we need some reference point. Thus to start off with we shall draw the pelvis, so now we are defined by the highest point of the leg (Pelvis) and the lowest point (served by the Guide Line)
Group the pelvis for we shall be using it for the other leg poses.

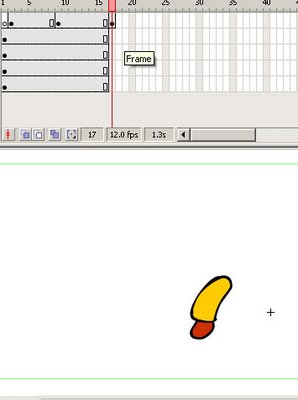
With the pelvis as the reference and the guide line as the base, draw the forward contact point of the leg.
 Insert a Blank Keyframe(F7) and switch on the Onion Skin so that we are now able to draw the Back Contact Point of the leg on frame#2.
Note (to traditional 2D Animators) : Inserting a Black Keyframe is like using a clean sheet of paper and using the 'Onion Skin' is very similar to using a light box. It is like switching on the bulb in the light box.
Draw the back contact point of the leg
Insert a Blank Keyframe between frame1 and frame2. Here we are going to draw the Passing Pose 1.
Insert a Blank Frame after the Contact Pose 2 , i.e frame4 and draw the Passing Pose 2.

There are 4 poses that are the defining points of a walk cycle.
The Final Part
Now that we have the 4 breakdown poses, let us introduce blank frames between each of the frames already created.
TIP: Go to frame1 press "F5" and then press "F7" , now go to frame3 and repeat the process and so on.
Create another blank frame after frame8 and copy frame1 to the the newly created frame9

The reason we do this is because, after frame8 The leg returns back to frame1. For Onion Skinning purposes we created frame9 which is the same as frame1
By default the Onion Skin, shows two frames ahead and before the frame its upon. To make the onion skin show the contents of only one frame ahead and before, click here to view the video
This video will show you how to create an Inbetween (i.e frame2)
To create an Inbetween may require a little practice. I didn't get it correct when I did it the first time so its normal if you make a mistake, clear the frame and redraw the Inbetween again.
Once frame2 is done, go to frame4. Here the Pelvis is placed much higher.

And on frame6 the pelvis goes lower, Copy the pelvis position from frame2 and paste in place on frame6 before drawing out the leg.
Copy the pelvis from frame4 and paste in place on frame8 .
Now comes a different part . On frame8 the leg is coming down , but what kind of reference would you follow ? for if you Onion Skin only one frame ahead and one behind you might get a position which may not play smooth when you export the walk cycle for preview. To make sure that the leg follows a nice path , Onion Skin from frame5.
Create a smooth 'S' which touches the heel of all the leg poses and draw the Inbetween for frame8, using the heel reference which now lies on the red line.

Delete the red 'S' curve. Right click on frame9 and choose "Remove Frames"
Use the "<" and ">" keys on the keyboard to go through the frames.
If you test your movie now (Ctrl+Enter) you will see the leg walking really fast. This is because the frame rate for this animation is very high.
Go to Modify/Document and drop the frame rate from 24 to 12. Pencil test (Ctrl+Enter) your movie.
16 Frame walkcycle
Start by inserting blank keyframes between all the frames .
TIP: Go to frame1 press "F5" and then press "F7" , now go to frame3 and repeat the process and so on.
Note : after creating the last blank frame at frame 16. copy frame1 to the the newly created frame16. Draw the inbetweens for all the frames. do remember that the pelvis will also change position.
 Now that we have one animated leg complete, running at 12fps. Let us cut all these frames and place them in a 'Graphic Symbol' called Leg01
Note: While rigging a character, I generally suffix the character's body part with a number instead of a name like left or right, this side or that side, Because one will never know how many variations one is going to make out of that part, thus using the Suffix-name, one will have legLeft, legRight, and in case you want to make a variation of the leftLeg symbol , then you would have a new complicated symbol called legLeft01. To avoid all this, I just stick to body part and a number
To cut the frames, first select all the frames (highlight them) and right click and select 'Cut Frames'. Once all the frames disappear from the time line. Go to Insert/New Symbol (Ctrl+F8). Name it Leg01 and select Symbol type as Graphic here
Now we are in the symbol, the timeline here shows only one frame. Right click on the first frame of the timeline and choose 'Paste Frames'. Go back to the main timeline. In the Library (Ctrl+L) drag the symbol 'Leg01'. Scrub the time line, or use the keys <> to see the leg animated.
Right click on the symbol in the library and choose "Duplicate", thus creating another symbol of the leg, name it Leg02. Drag Leg02 from the Library on to the main timeline.
We have to match the pivot point of the symbol to that of the Legs pivot circle. So select Leg01, and from the toolbar select the free transform tool (Q) and move the small circle which is right at the center of the symbol and move it to the center of the leg's pivot. Repeat the same thing for the other symbol leg02 too.

Making sure you are on frame one, align the symbols one over the other in such a way that it looks like there is only one leg on the work area. Click on the symbol and go to the properties bar and change the instance of the symbol from 1 to 9.
(Ctrl+Enter) Test the movie. to see the two legs move in sync.
click here to see sample
Let us now go and color up the legs. Click on one of the symbols to figure which symbol is leg01. since both the symbols are on the same layer. We are going to bring leg01 to the top, by selecting it and using Ctrl+Shift+up or Modify/Arrange/Bring to Front.
Scale the two symbols so that there is space for the body and head.
Create a new layer on top of this layer and draw a body. Convert it to a symbol (F8) and place it over the legs. Scrub the time frame to see if it fits over the leg.
Create a new layer on the top and draw the head. Convert it to a symbol.
Note: I included a collar in the head so it helps while animating the head.
click here to see sample
In a new layer, create the character's hand. Name the symbol 'Hand01'

Using the Free Transform Tool(Q), move the pivot point to the shoulder.
Before we proceed any further, we shall fill color into the leg symbols. Color the Leg symbol at the back a color that's a bit dull as compared to the leg in the front.
Note: Once inside the leg symbol, you can use the edit multiple frame to select all the frames and ungroup the pivot for the leg, instead of individually going through each and every frame and breaking it up. Check this tutorial By Adam Phillips.
click here to see sample
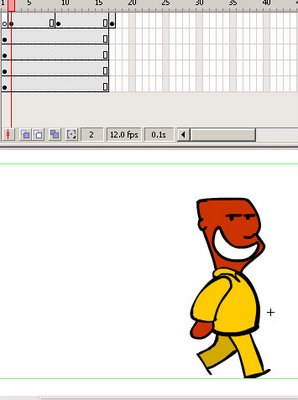
Our next step is to make the hand sway. We can have one hand on the top most layer and copying the same hand and placing it in the bottom most layer.
Thus renaming the layers, it would be organized like this.

Basic Walk cycle techniques: When the Leg is at its extreme the hand reaches its extreme only on the next frame. Thus it lags behind by one frame.

Create Three Key frames, namely on frame 2, 9 and 17. On 2 place the hand to its extreme position.

On 9 the hand is moved to the other extreme position.
And on frame 17, copy the hand position from 2 and paste it in 17.
Keyframe (F6) on frame 10 so that the hand has a hold of two frames on its extreme.
Now motion tween frames 2 to 9 and frames 10 to 17
On the Property bar, move the ease all the way to 100

Select Frame 17 and copy the position of the hand and 'paste in place' on frame 1.
Thus frame 1 and 2 will have the hand in one extreme position and frame 9 and 10 will have hand in the other extreme position.
Now repeat the same process from the other hand, but do remember to change the extreme position, in the opposite direction.
Once this is done, go back to the main timeline by clicking on the 'scene 1' on the top panel bar (as shown below)
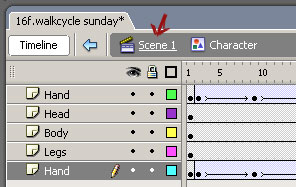
Back on the main timeline, delete all the layers except the last one and rename that to character.
Note: Check to make sure that there are only 16 frames in the main timeline.
Drag the Character Symbol out of the library and place it on the stage. Test you movie,(Ctrl+Enter)
Download FLA. (160KB)
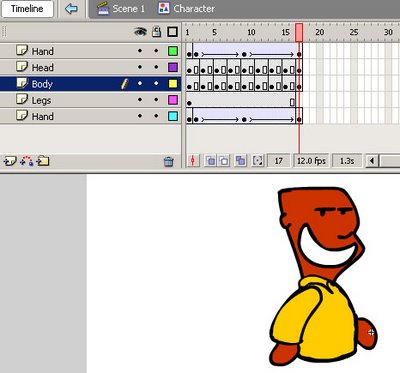
Go into the Symbol and introduce two new Keyframes at Frame 16, on the Head and Body Layer. Introduce Keyframes on every alternate frame on the same two layers such that the time line looks like this.

(a) At Frame3, select the body and head and make it fall lower, as the leg is coming to the Contact Position.
(b) At Frame7, select the body and head and make it rise higher, as the leg is coming to the Contact Position.
Repeat Step (a) for Frame11 and Step(b) for Frame15
Note: play around with the variation of body and head position with reference to the walk to get a varied style of the cycle
Add motion tween to all the key frames in the Head and Body Layer
Selecting all the tweened frames on the two layer considered, play around with the easy in or ease out to produce varied effects to the cycle.
Test you movie(Ctrl+Enter)
Download FLA. (144KB)
Example
Subscribe to:
Posts (Atom)